Optical sighting system for big telephoto lens bird photography
 After
investing in a more serious telephoto lens setup for bird photography, I
learned that acquiring and tracking birds in flight can be one of the
trickier aspects for getting good BIF (Bird In Flight) images. If you
consider 500mm lens on a camera with a 1.6x crop factor and a 1.4x
teleconverter to boot, then you end up dealing with a magnification of about
22.4x when normalized to a 50mm lens on a full frame 35mm equivalent
camera. Trying to acquire a bird flying by through your lens at this
magnification, and then tracking it such that you can maintain focus lock
can be quite a challenge. A gimbal head for your tripod definitely can
help, but I figured that after such an investment that perhaps something
more could be done to help.
After
investing in a more serious telephoto lens setup for bird photography, I
learned that acquiring and tracking birds in flight can be one of the
trickier aspects for getting good BIF (Bird In Flight) images. If you
consider 500mm lens on a camera with a 1.6x crop factor and a 1.4x
teleconverter to boot, then you end up dealing with a magnification of about
22.4x when normalized to a 50mm lens on a full frame 35mm equivalent
camera. Trying to acquire a bird flying by through your lens at this
magnification, and then tracking it such that you can maintain focus lock
can be quite a challenge. A gimbal head for your tripod definitely can
help, but I figured that after such an investment that perhaps something
more could be done to help.
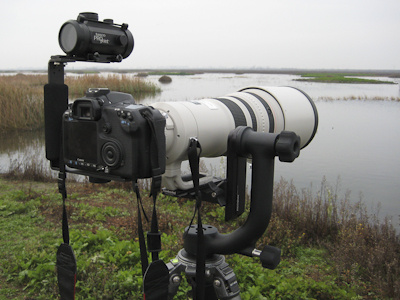
That is when I noticed that some hunters use what is called a red dot
optical sight. This is similar in appearance to a normal scope, but shorter
and typically with no magnification. Instead of cross hairs, you have a
small LED illuminated red dot focused at infinity at the center of the
sight. Because there is limited or no magnification, it is has a wider
field of view and relatively easy to find your target while viewing through
it. Both have the same objective of try to acquire and lock on to a target
in-flight. If it can work for them, then why couldn’t the same capability
be adapted for the camera instead of the gun?
After going to a few sporting good stores, I decided on a Tasco 42mm sight
that mounts on to a rifle using a standard weaver scope mount with a cost of
about $65. There are cheaper ones out there, and more expensive versions as
well, but this one struck me as being of sufficiently quality (all metal
construction) and having a relatively wide field of view.
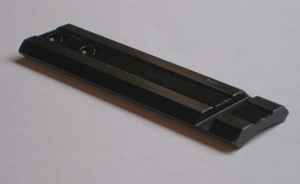 The
next step was to figure out how to adapt a weaver mount to my camera rig
with the big lens attached while on a gimbal mount. So at the gun store, I
also purchased a weaver mount adapter plate designed for attachment for
various rifles. I was not sure how I was going to make it work, but at
about $10, I figured I would come up with something after getting home and
tinkering around in the garage.
The
next step was to figure out how to adapt a weaver mount to my camera rig
with the big lens attached while on a gimbal mount. So at the gun store, I
also purchased a weaver mount adapter plate designed for attachment for
various rifles. I was not sure how I was going to make it work, but at
about $10, I figured I would come up with something after getting home and
tinkering around in the garage.
 At
first I explored the idea of mounting the sight on the hot shoe of the
camera. Going on the internet and looking for hot shoe adapter brackets, I
also learned I was not the first to come up with this idea, and that in fact
someone has a business of selling weaver mounts that lock into your camera’s
hot shoe. It is called "Xtend-a-sight" and I ordered this from
Photosolve (it cost about $25), but after trying it I was not satisfied
with the results. The way this attached to the hot shoe was not
sufficiently rigid. It also tended to bend the camera hot shoe bracket
outward to create enough tension to hold it in place. But no matter how much
tension I applied on the locking allen screw with this bracket, it would
continue to wobble with the red dot sight attached. It seemed like a bad
design to me, and caused me concern that it could eventually cause permanent
damage to the hot shoe on my camera body if I continued to tighten it
further.
At
first I explored the idea of mounting the sight on the hot shoe of the
camera. Going on the internet and looking for hot shoe adapter brackets, I
also learned I was not the first to come up with this idea, and that in fact
someone has a business of selling weaver mounts that lock into your camera’s
hot shoe. It is called "Xtend-a-sight" and I ordered this from
Photosolve (it cost about $25), but after trying it I was not satisfied
with the results. The way this attached to the hot shoe was not
sufficiently rigid. It also tended to bend the camera hot shoe bracket
outward to create enough tension to hold it in place. But no matter how much
tension I applied on the locking allen screw with this bracket, it would
continue to wobble with the red dot sight attached. It seemed like a bad
design to me, and caused me concern that it could eventually cause permanent
damage to the hot shoe on my camera body if I continued to tighten it
further.
 I
then settled on the idea of using a right-angle flash bracket that screws
into the 3/8” mounting hole at the bottom of the camera. I already owned
one and noticed that it seemed to be sufficiently rigid and heavy duty in
construction, and speculated that one could be retrofitted to hold a red dot
sight instead of a detachable flash head. So I ended up purchasing a lower
end cheap chinese knock-off for about $15 for this purpose that was of
sufficient girth to support the weight of the sight and not wobble or bend
out of alignment too easily while in use in the field.
I
then settled on the idea of using a right-angle flash bracket that screws
into the 3/8” mounting hole at the bottom of the camera. I already owned
one and noticed that it seemed to be sufficiently rigid and heavy duty in
construction, and speculated that one could be retrofitted to hold a red dot
sight instead of a detachable flash head. So I ended up purchasing a lower
end cheap chinese knock-off for about $15 for this purpose that was of
sufficient girth to support the weight of the sight and not wobble or bend
out of alignment too easily while in use in the field.
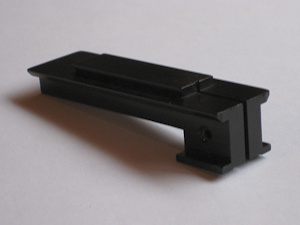
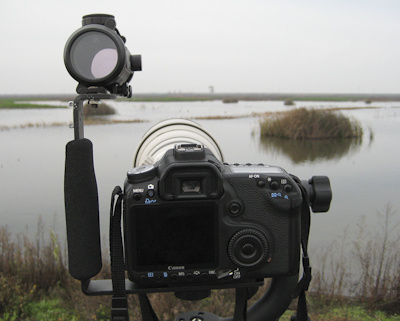
The next step is to replace the hot shoe at the end of the right-angle hot
shoe bracket with a weaver mount adapter plate instead. This ended up being
relatively easy to do:
-
With the flash
bracket in a vise, drill out the rivets holding the hot shoe plate and
remove it. In my case, I was able to use these rivet holes as the basis
for mounting the weaver mount adapter plate. Two holes at a minimum
will be needed, but if you have the space, three would provide more
stability.
-
Manually align the
weaver mount adapter plate on the flash bracket the way you would like
to see it positioned with the red dot sight attached while in use with
the camera. As a general guideline, you should position the back of the
sight roughly at the same distance to the viewer as the back of your
camera.
-
Once you have this
aligned to your satisfaction, place marks with a pencil on the weaver
mount adapter plate through the holes of the flash bracket where you
will drill.
-
Acquire 2-3 fine
machine screws (black anodized would be nice) with locking washers and
nuts that will be used to mount the two pieces together. The heads of
these screws also need to clear the red dot sight bracket hardware when
it is attached.
-
With the weaver
mount adapter plate in a vise, drill the marked holes in step #3 at a
diameter to accommodate the machine screws acquired in step #4.
-
Connect the two
pieces together with the machine screws, using the lock washers and
nuts, and viola!
You have a red dot
sight based setup for high performance bird photography. The total cost
for this project was about $100. You could build it even cheaper by
settling on a lower end red dot sight, but I am not sure I would recommend
that.
The next step is to calibrate this setup and put it through some field
trials. The first thing I realized is the importance of having spare
batteries. The Tasco sight has no auto-off and I had apparently left the red
dot sight “on” while stored in my bag or from the last time I had been
experimenting with it. This model uses a standard CR2032 battery and lasts
about 4-8 hours according to the gun shop owner. So on my 2nd trip after
purchasing some spare batteries to have in the bag, I was off again to one
my favorite birding locations.
 Set
this up by screwing it into the mounting hole at the bottom of my camera as
a last step after first attaching the telephoto lens onto the camera and
attaching the whole thing on the gimbaled tripod mount. To sight align this
setup, first lock the camera down with the gimbal head on a target at about
the same distance you expect to be taking most of your BIF related
photography from. Rough left-right (windage) alignment should be achieved
by simply loosening the bracket mount to the camera and pivoting in either
direction, and then tightening it down. Fine adjustment should be done by
unscrewing the elevation and windage adjustment protective caps on the sight
itself, and then tweaking the adjustment screws until the red dot matches
the target that you have set for the center focus mark as seen through the
viewfinder of your camera. If you don’t have a screwdriver with you, a dime
or a penny can work pretty good. This alignment exercise needs to be applied
after every setup, but should only take about 5 minutes to complete.
Set
this up by screwing it into the mounting hole at the bottom of my camera as
a last step after first attaching the telephoto lens onto the camera and
attaching the whole thing on the gimbaled tripod mount. To sight align this
setup, first lock the camera down with the gimbal head on a target at about
the same distance you expect to be taking most of your BIF related
photography from. Rough left-right (windage) alignment should be achieved
by simply loosening the bracket mount to the camera and pivoting in either
direction, and then tightening it down. Fine adjustment should be done by
unscrewing the elevation and windage adjustment protective caps on the sight
itself, and then tweaking the adjustment screws until the red dot matches
the target that you have set for the center focus mark as seen through the
viewfinder of your camera. If you don’t have a screwdriver with you, a dime
or a penny can work pretty good. This alignment exercise needs to be applied
after every setup, but should only take about 5 minutes to complete.
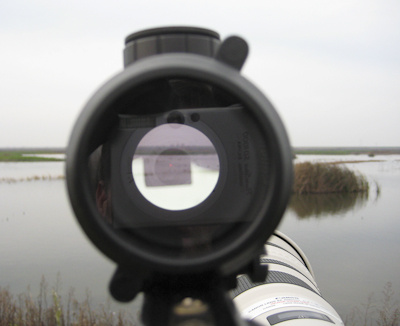
Now that I may have gotten some folks excited about this, I must now
confess: The results of this effort have not been as positive as I was
expecting. Although it is now much easier to acquire a target through the
red dot sight and track it across the sky, one challenge has been the
magnification disparity between my 500mm telephoto lens setup with the 1.4x
teleconverter is too much with respect to the red dot in the sight. The
area covered by the red dot in general is much larger than the area of the
center focus mark as seen through the viewfinder of my camera at this
magnification. Even when you think you are locked on the target, it may
still not be close enough for the camera focus lock using the center focus
sensor only. I have found that this disparity is not as bad without the
teleconverter attached to the lens (i.e. just 500mm), but also the need to
use this sight diminishes accordingly. Perhaps part of the issue is that
personally over this same time, I have gotten more experienced and skilled
in the tracking of birds through the big lens without the need for the red
dot sighting system (see my
Bird Gallery). I have found in critical situations I tend to put more
trust in my ability to acquire the bird via the camera viewfinder than
through the red dot sight. Another factor is that my current camera setup
is based on a Canon 50D. The new Canon 7D has a better auto-focus
capability that almost seems designed specifically for birding related
photography. From what I have read, the 7D supports a focus mode that
allows you to use a smaller cluster of auto focus sensors grouped toward the
center together. I would expect this to be much more friendly for matching
up to the area of uncertainty covered by the red dot via the separate sight
and acquiring focus lock. Another suggestion that could help is to get a
red dot sight that has a slight magnification to it. Perhaps something in
the range of 2-4x would be a good compromise between having sufficient field
of view to find your target, but magnified sufficiently to properly align
the red dot to your camera’s auto focus sensor?
Stay tuned for further results in the future…
If others have additional inputs or learnings on this, feel free to send me
an email I will append them to this article (Sorry I currently don’t have a
blogging capability with this web site, as I am new to web development and
learning to do this as I go).